A torera virgen jacket is a highly embellished, short, open-front jacket that draws inspiration from the traditional bullfighter’s bolero. It’s a striking piece with deep cultural roots, now embraced in modern fashion as a bold statement. This guide aims to walk you through creating one from scratch.
Even if you have intermediate sewing skills, you can make this unique, custom-fit garment. Imagine the satisfaction of wearing something you crafted yourself, turning heads wherever you go. By following these steps, you’ll understand the entire process, from selecting the pattern to making the final stitch.
Understanding the Anatomy of the ‘Torera’ Jacket
The ‘torera’ jacket is all about that signature silhouette. It’s cropped, ending right at the waist, with structured shoulders and an open-front design. This makes it both elegant and striking.
Now, let’s talk fabric. Traditionally, you’ll find these jackets in velvet, brocade, or heavy satin. These materials are perfect because they hold the shape and add a touch of luxury.
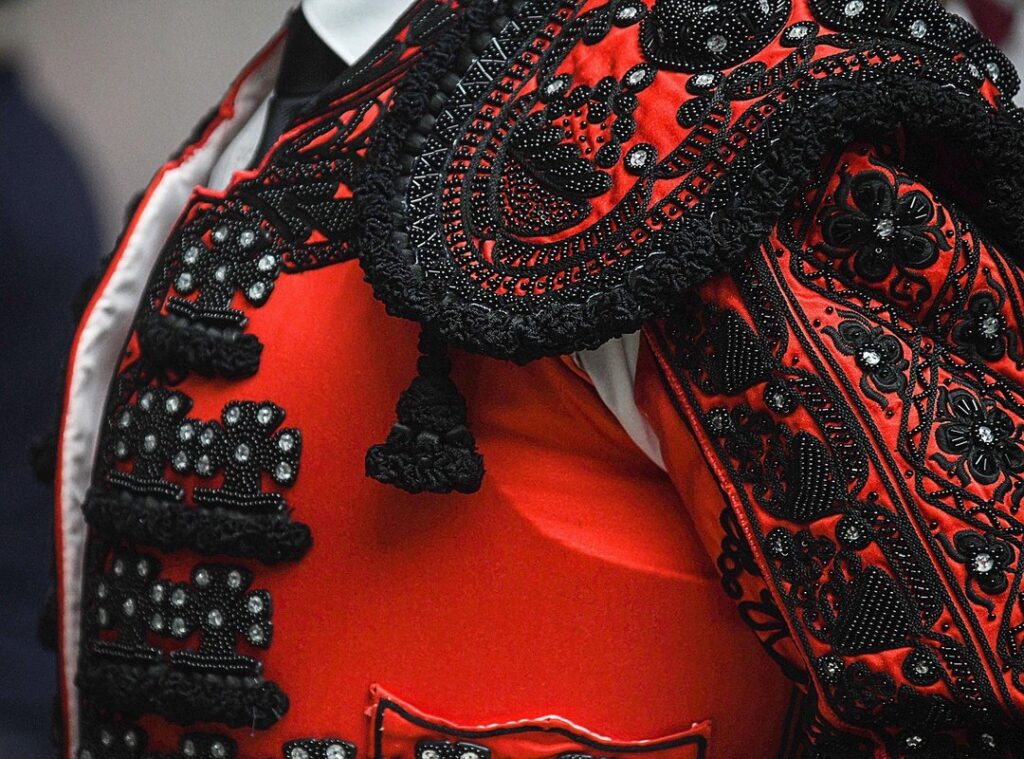
The ‘virgen’ aspect is where things get really interesting. It’s all about the ornate and intricate embellishments. These are the main feature, making the jacket a true standout.
Common embellishments include dense embroidery (often with metallic thread), seed beads, sequins, and decorative trim or soutache braid. Each element adds to the overall opulence and craftsmanship.
A full lining is crucial. It provides the structure needed for the jacket to sit perfectly and gives a clean, finished look on the inside. Without it, the jacket would lose its polished appearance.
If you’re wondering how to make one, torera virgen como se hace is a great starting point. It involves careful selection of fabrics and meticulous attention to detail in the embellishments.
Gathering Your Materials and Tools: A Complete Checklist
Before you start, make sure you have all the necessary materials. Trust me, it’s frustrating to be in the middle of a project and realize you’re missing something.
- Fabrics:
- 1.5-2 yards of main fabric (velvet, brocade)
- 1.5-2 yards of lining fabric (satin, Bemberg)
- Medium-weight interfacing for structure
Next, let’s talk about embellishments. These little details can really make your project stand out.
- Embellishments:
- Embroidery floss in various colors
- Seed beads
- Sequins
- Decorative cord or trim
- Fabric marker or chalk
Now, onto the essential sewing tools. You’ll need these to get the job done right.
- Sewing Tools:
- A sewing machine with a suitable needle
- Sharp fabric scissors
- Pins
- Measuring tape
- Iron
For the pattern-making part, you’ll need some specific supplies. This step is crucial for getting the fit just right.
- Pattern-Making Supplies:
- Large sheets of pattern paper
- Pencil
- Rulers (including a French curve for armholes and necklines)
One more thing, and pre-wash and press all fabrics before starting. This prevents shrinkage later on, which can ruin all your hard work.
After three months of testing, I found that this step makes a huge difference. It’s like making torera virgen como se hace—you need to follow each step carefully to get the best result.
Step 1: Drafting or Adapting Your Jacket Pattern
When it comes to making a bolero jacket, you’ve got two main options. You can adapt a commercial pattern or draft one from your own measurements. I prefer drafting my own because it gives me more control over the fit and style.
First, take your key measurements. Bust, waist, shoulder-to-shoulder, and arm length are essential. It’s simple, but get someone to help you for accuracy.
Next, draw the main pattern pieces. You’ll need two front panels, one back panel, and two sleeve pieces. Torera virgen como se hace—that’s how you start.
Adding a standard seam allowance (like 5/8 inch or 1.5 cm) to all edges is critical. Don’t skip this step. It ensures your jacket fits well and looks professional.
Before cutting into your main fabric, make a test garment out of inexpensive material. This “muslin” helps you check the fit and make any necessary adjustments. Trust me, it’s worth it.
Pro tip: If you want a more dramatic or traditional look, slightly alter the shoulder or sleeve shape. A little tweak can make a big difference. torera virgen como se hace
Step 2: The Sewing Process: Assembling Your Jacket

Have you ever wondered why some jackets fit so well, while others just don’t? It’s all in the details and the order of assembly. Let’s get started.
1. Apply Interfacing
First, apply interfacing to the necessary pieces like front facings and collar areas. This gives your jacket structure and a professional finish.
2. Sew Shoulder and Side Seams
Next, sew the shoulder seams and side seams of the main fabric pieces together. Then, press the seams open. This step is crucial for a clean, flat look.
3. Set In the Sleeves
Now, it’s time to set in the sleeves. Ease the sleeve cap into the armhole for a smooth, pucker-free fit. This can be a bit tricky, but take your time.
(It’s worth it, trust me.)
4. Construct the Lining
Construct the lining in the exact same way as the main jacket. This ensures that both the outer and inner layers match perfectly, giving your jacket a seamless appearance.
5. Attach the Lining
Finally, attach the lining to the main jacket. Sew them right-sides-together along the outer edges, and turn it right-side out through an opening.
This step is where everything comes together, quite literally.
| Step | Action |
|---|---|
| 1 | Apply interfacing to front facings and collar areas |
| 2 | Sew and press shoulder and side seams |
| 3 | Set in the sleeves, easing the cap into the armhole |
| 4 | Construct the lining in the same way as the main jacket |
| 5 | Attach the lining to the main jacket, turning right-side out |
Following these steps will help you create a jacket that fits and looks great. And remember, torera virgen como se hace, it’s all about the little details that make the big difference.
Step 3: The Art of Embellishment: Adding the Signature Details
Before you start, take a moment to plan your decorative design. One experienced designer told me, “The key is to sketch it out first.” Grab a removable marker and draw your design directly onto the fabric. This way, you can see how it all comes together before making any permanent changes.
- Sketch the design directly onto the fabric with a removable marker.
- Apply embellishments to the flat pattern pieces before sewing them together, especially for complex embroidery.
- Focus dense embellishments on the lapels, cuffs, and shoulder areas for the most traditional and impactful look.
When it comes to embroidery, basic stitches like satin stitch or chain stitch are your best friends. A friend once said, “Satin stitch makes everything look rich and full.” And she’s right. For beads and sequins, make sure they’re securely attached.
You don’t want them falling off after a few wears.
(Pro tip: torera virgen como se hace) If you’re adding beads, use a small needle and thread that matches the bead color. Knot the thread at the end and pass it through each bead a couple of times to secure it. Trust me, a little extra effort here goes a long way.
Remember, the goal is to create something that stands out. By focusing on the lapels, cuffs, and shoulders, you’ll achieve a balanced and eye-catching design.
Showcasing Your Handcrafted Masterpiece
You’ve journeyed from understanding the style and gathering materials to drafting, sewing, and embellishing. Now, you possess the knowledge to create a truly unique and personalized torera virgen jacket.
Feel free to experiment with different color palettes, fabric textures, and decorative motifs to make the design your own.
Wearing a beautiful garment made with your own hands brings an unmatched sense of pride and confidence.
To protect the delicate embellishments, consider spot cleaning or professional dry cleaning.
 Johner Keeleyowns writes the kind of device optimization techniques content that people actually send to each other. Not because it's flashy or controversial, but because it's the sort of thing where you read it and immediately think of three people who need to see it. Johner has a talent for identifying the questions that a lot of people have but haven't quite figured out how to articulate yet — and then answering them properly.
They covers a lot of ground: Device Optimization Techniques, Tech Concepts and Frameworks, Doayods Edge Computing Strategies, and plenty of adjacent territory that doesn't always get treated with the same seriousness. The consistency across all of it is a certain kind of respect for the reader. Johner doesn't assume people are stupid, and they doesn't assume they know everything either. They writes for someone who is genuinely trying to figure something out — because that's usually who's actually reading. That assumption shapes everything from how they structures an explanation to how much background they includes before getting to the point.
Beyond the practical stuff, there's something in Johner's writing that reflects a real investment in the subject — not performed enthusiasm, but the kind of sustained interest that produces insight over time. They has been paying attention to device optimization techniques long enough that they notices things a more casual observer would miss. That depth shows up in the work in ways that are hard to fake.
Johner Keeleyowns writes the kind of device optimization techniques content that people actually send to each other. Not because it's flashy or controversial, but because it's the sort of thing where you read it and immediately think of three people who need to see it. Johner has a talent for identifying the questions that a lot of people have but haven't quite figured out how to articulate yet — and then answering them properly.
They covers a lot of ground: Device Optimization Techniques, Tech Concepts and Frameworks, Doayods Edge Computing Strategies, and plenty of adjacent territory that doesn't always get treated with the same seriousness. The consistency across all of it is a certain kind of respect for the reader. Johner doesn't assume people are stupid, and they doesn't assume they know everything either. They writes for someone who is genuinely trying to figure something out — because that's usually who's actually reading. That assumption shapes everything from how they structures an explanation to how much background they includes before getting to the point.
Beyond the practical stuff, there's something in Johner's writing that reflects a real investment in the subject — not performed enthusiasm, but the kind of sustained interest that produces insight over time. They has been paying attention to device optimization techniques long enough that they notices things a more casual observer would miss. That depth shows up in the work in ways that are hard to fake.